By Low Jeremy
There are several manufacturers of motorcycles around the world. The BMW for one, builds performance driven motorcycles for years. Japan-made Honda, Kawasaki, and Yamaha also have race winning motorcycles. Ducati is another motorcycle brand that is very popular around the world. But why a Harley Davidson?
Why is Harley-Davidson so popular around the world? Why is that when a Harley rolls on the road, everyone will turn their heads for a glance? Why is it that when one talks about motorcycle, the very first brand in mind is the Harley-Davidson?
Finding answers to these questions will give us 3 words: name, quality, and pride.
Name – When you hear the word “Harley-Davidson”, the first thing that might pop out from your mind is a “one hell of a machine”. Hearing the name “Harley-Davidson” would also easily gives you the impression of a great motorcycle company that set a great legacy throughout history. The name can be synonymous with toughness, quality, speed, and versatility. The name itself will set itself on the top of your mind.
Quality– Whether it is a CVO (Custom Vehicle Operations), Dyna, Sportster, Softail, Touring, or VRSC model, it is a Harley-Davidson. And when we say Harley-Davidson, we mean quality that is built over the years. Each Harley-Davidson motorcycle is made in superiority from the engine parts to the decals and finishing touches. Harley-Davidson motorcycles are made not only to sell but to live for a lifetime as well.
Pride – Harley-Davidson has been manufacturing motorcycles for over a century. And with a company that survived this long, owning one is like owning a piece of history of the company. Harley-Davidson motorcycles have gained so much respect over the years and it has set the trend for the motorcycle industry in the United States. Any Harley-Davidson motorcycle owner would say that they are proud to have at least one great motorcycle in their possession.
What would you feel if you are riding a motorcycle with the name “Harley-Davidson”? Surely, you feel proud. Proud as if you have your first baby; proud as if you have owned a brand-new house; and proud as if you have realized your dream. Indeed, owning a Harley-Davidson can be a dream come true for most. As the price of a Harley motorcycle does not come cheap, owning one can be hard. But if you do, you feel fulfilled and you somehow feel you have your life complete.
How about you? Why are you dying to have a Harley-Davidson motorcycle? The answer is in you…
Thursday, September 28, 2006
Why a Harley Davidson Motorcycle
Saturday, September 23, 2006
The Advent of Car LCD Screens
By Peter Vermeeren
The advent of LCD (Liquid Crystal Display) screens has resulted in an amazing number of applications, which were simply not viable because of the size of CRT display monitors. Car LCD screens have proven to be one of the biggest bonanzas for the consumer market. Because of smaller, lighter and thinner LCD monitors, we can use computers in the car or hook up TV, DVD players and even video game consoles. Just imagine, to be able to watch your favorite TV shows or a movie while traveling long distance is a great source of entertainment for everyone; except for the driver of course! Even the kids can remain busy playing their much-loved video games. You can practically convert your car or SUV into a mobile home theater and enjoy just about all the amenities that you normally would in your household.
Car LCD screens have been instrumental in the growth of so called "in-vehicle computer manufacturers" offering low cost, low end "car pc systems" or "carputers". You can use a car PC or carputer to send or receive e-mails or do any of business related work. These revolutionary conveniences are the result of car LCD screens in conjunction with many other innovative technologies like hand held computers, wireless communications or satellite communications and others.
Car LCD screens come in many sizes and formats (regular or wide screen), ranging from about 7 inches to 12 inches and more to suit the various car types available in the market. You can go with base mounted LCD monitor if there is enough room in the vehicle or you can opt for smaller and compact in-dash screen. You can even get car LCD screens that also offer USB touch screen capabilities. The working of touch screens is based upon emulation of mouse. Consequently, any software designed to work with a mouse will work with the touch screen monitors mounted in the car. Besides the space saving design and size of the car LCD monitors, they also offer an extraordinary bright and high-resolution picture quality that is a treat to watch.
GPS (Geographical Positioning System) is probably one of the most outstanding applications made possible by the development of car LCD screens. This state of the art technology is simply amazing and very useful for every driver on the road. You will never make a wrong turn and never get lost again if your vehicle is equipped with GPS technology. GPS software packages are available for the USA, Canada and most of Europe. It offers the capability to receive turn-by-turn directions to any address nationwide. Because of the clarity of picture quality, the user interface is easy to read on nearly any small car mounted LCD monitor, with its contrasting colors, big icons and fonts. You can even plan your trip to optimize your route before you even leave home! It is a great system for long distance travel that enables traveling from point A to B safe, simple and efficient.
It may sound a little far fetched but the use of GPS technology in combination with the car LCD screens can be extended to achieve some incredible feats. You can probably envision, a lost child or a pet equipped with the GPS chip can be located and traced on your vehicle monitor. Thanks to LCD technology that has made all this feasible.
Sunday, September 17, 2006
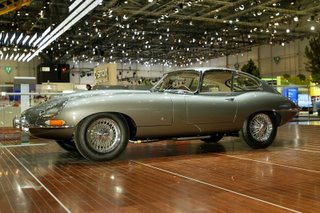
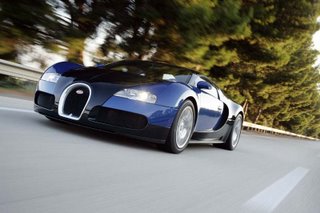
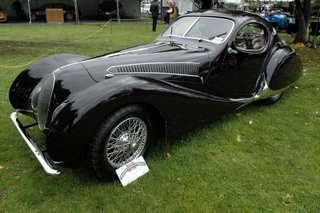
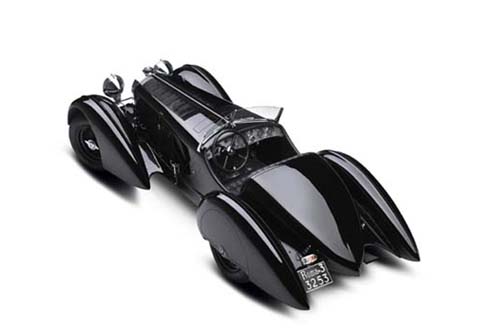
10 Most Beautiful Cars of All Time
- Jaguar E Type
- 1930 Mercedes-Benz Count Trossi SSK

- Bugatti Veyron 16.4
- 1938 Talbot-Lago T150 C SS Teardrop Coupe
- Pagani Zonda

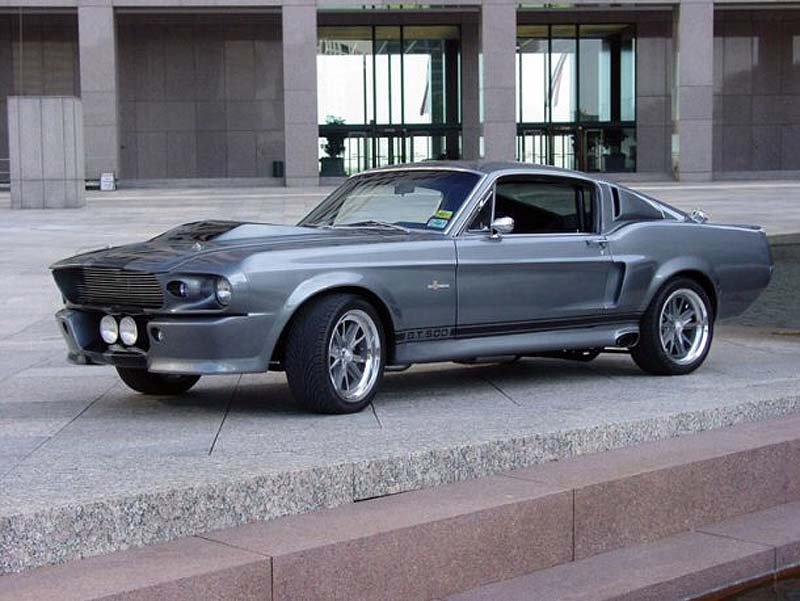
- 1967 Shelby Mustang Eleanor GT500

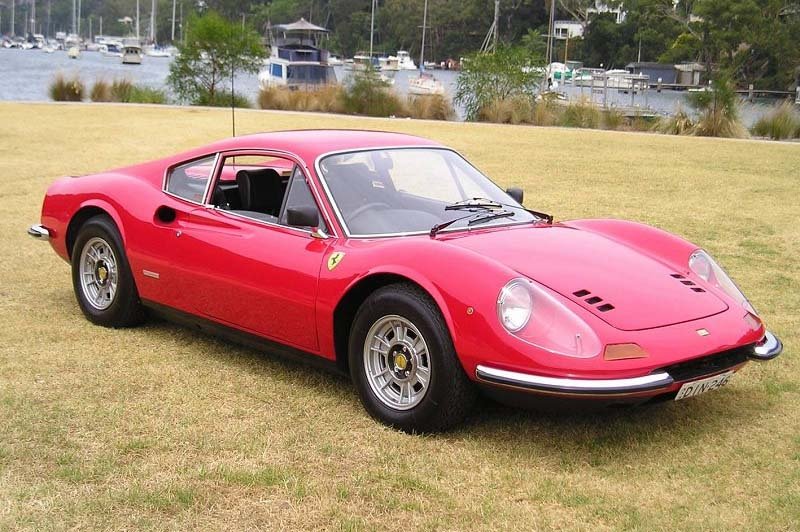
- Ferrari Dino

- 1955 Mercedes-Benz 300SL Coupe

- Rolls-Royce Phantom

- Aston Martin DB4 GT Zagato


Wednesday, September 13, 2006
How to Change Your Car's Motor Oil
By Stephen Bucaro
First, let's answer the question; Why should you change your own oil? Because you can save time and money. You don't have to wait in line at the service garage or quick oil change shop. For ten bucks you can get the best oil and a brand new oil filter. And, it's so easy to do that you could train a monkey to do it.
Changing your cars motor oil is a very simple three-step process: 1. Drain the old oil. 2. Replace the oil filter. 3. Add the new oil. But before we go through the steps, lets answer a few basic questions.
When should I change my oil?
Look in your cars owners manual. Most auto manufacturers recommend changing the motor oil every 6,000 miles for normal service, or every 3,000 miles for severe service. I change my oil every 6,000 miles, and my engines run like new when I trade my vehicles in with well over 100,000 miles on them. One thing that I do is change a new cars oil after the first 300 mile break-in period. Then, after that, I change the oil every 6,000 miles.
What kind of oil should I use?
You are not going to save money by using an off-brand oil because your engine will wear out sooner. Use oil that meets the American Pertroleum Institute (API) classification SL. I use Valvoline, Quaker State, Pennzoil, or Havoline brand oil. These quality oils contain additives that make them work better and longer.
If you are changing your oil just before winter, use SAE 10W30 weight oil. This number means the oil will have a thin 10 weight viscosity when the engine is cold, helping the engine to start easier, and then the oil will thicken to 30 weight viscosity when the engine warms up, protecting the engine better. If you are changing oil just before summer, use SAE 10W40 weight oil. The extra 40 weight viscosity will protect your engine better when it's hot.
What's the First Step?
First let your engine cool off. Modern engines run at close to 300 degrees (F) and hot oil will definitely give you a severe burn. You shouldn't have to jack your car up unless you have some kind of ground hugging sports car or low rider. Almost all cars have enough space underneath to reach under and change the engine oil.
Step 1: Drain the old oil.
Locate the oil drain plug and place a pan under it to catch the oil. With a box wrench, remove the oil plug.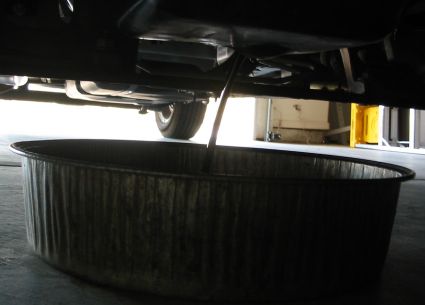

If you have a GM dual-overhead-cam EcoTec engine you may have a difficult time locating the drain plug on all that aluminum.
When the oil stops draining, reinstall the drain plug.
Note for newbies: To replace the drain plug turn it clockwise. Start the plug with your fingers. If it seems even slightly hard to turn, back it out! You are crossing the threads.
Step 2. Replace the oil filter.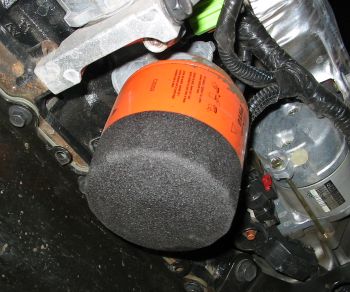 Move your oil catch pan under the oil filter. Using an oil filter wrench to get it started, remove the oil filter. (newbies: counter-clockwise, and you will get some oil on your hand.)
 Pictured above is a strap type oil filter wrench. This is the best kind to use.
 Pictured above is a socket type oil filter tool. You use this type with a ratchet just like a regular socket. The problem with the socket type is that it tends to get stuck on the filter. Use the socket type tool if you don't have enough clearance around the oil filter to use the strap type.
With your finger put a thin coat of oil on the new filter's gasket to make it seal better.
!!! Now pay attention - here's were you can screw up royal!
With your hand, install the new oil filter. If it seems even slightly hard to turn, back it out! You are crossing the threads. Most filters have an instruction printed on them to give the filter one more turn after the gasket has made contact.
Here's what I recommend: screw the filter on until its "hand tight". Then use the oil filter wrench to snug it up another 1/8 to 1/4 turn. This is critical!
When the vehicle is running, the oil pump puts the oil under pressure. If you don't install the oil filter tight enough, the oil will come gushing out. If this happens Shut down the engine immediately! Without oil, an engine will lock up within seconds.
The first time I changed my oil, I used the filter wrench to tighten the filter as tight as I could get it. Wrong! The next time I went to change my oil, I couldn't get the filter off. Luckily I had plenty of room around the filer, so I hammered a screw driver through the body of the filter and used the handle of the screw driver to turn the filter off.
Warning! Don't over-tighten the filter. Follow the instructions above carefully!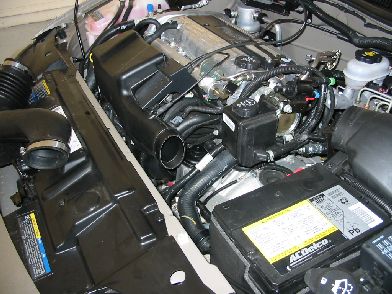 The GM dual-overhead-cam EcoTec engine has an unusual oil filter located on top of the engine. This picture shows the engine with the air intake hose removed. That's the oil filter canister just to the right of, and below, the end of the open air intake tube. Use a proper size wrench to remove the canister lid.
 The GM dual-overhead-cam EcoTec engine uses a filter cartridge. Shown above is the filter cartridge and the filter canister lid.
Step 3. Add the new oil.
Locate the oil filler cap on the valve cover. I've seen newbies pour motor oil in everything from the master brake cylinder to the radiator cap. Make sure you have located the the oil filler cap. Remove the oil filler cap.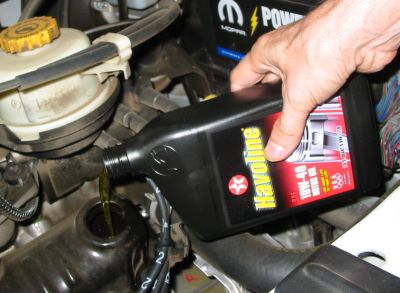 When pouring the oil, hold the oil "can" as shown. You would be wise to use a funnel between the oil can and the valve cover oil filler hole.
How much oil should you add? Look in your cars owner manual. Most engines have a capacity of four or five quarts. Don't overfill the crank case. When you run the engine the extra oil will be blown out through the PCV value, possibly stalling your engine.
Tip: If you don't know the oil capacity of the engine, add four quarts, then check the oil level, if it's a quart low add another quart.
Replace the oil filler cap.
Step 4. Start the Engine.
Yes, I know, I said there where only three steps. You're finished, this is not really a "step".
Start the engine and make sure the oil warning light goes off. Look under the vehicle to make sure oil is not leaking out. Turn off the engine and let it set for a minute to let the oil drain down to the crank case. Then use the dip stick to check the oil level.
How to check the oil level: Remove the dip stick, wipe it clean with a rag, reinstall the dip stick. Make sure the dip stick is in all the way or you will get a false reading. After a few seconds remove the dip stick and examine how far up the stick is covered with oil. Most dip sticks have a “full” mark printed on them.
Note: I find the best way to dispose of the old oil is to use a funnel to pore it from the collection pan into the bottles from which the new oil came. When I get a big pile of used oil bottles I bring them to the oil recycling center. Be sure to mark the used oil bottles so you don't accidentally think they are new oil.
Thursday, September 07, 2006
Get a VIN Search Before you Buy your Next Used Car
By David Bloom
The VIN search is a very important part of the used vehicle buying process. It is usually the last step before the final decision is made; after the car has passed professional inspection and test driving. The VIN search digs deep into the vehicle's history to reveal any hidden problems, as well as other vital information, so that you can be confident that you are purchasing the right vehicle.
A lot of people believe that it is enough to give a car a visual inspection and drive it around for a while to decide whether or not it is worth purchasing. The problem is, oftentimes even the most trained mechanic will overlook something, or a cursory test-drive will not reveal a persistent problem that perhaps manifests itself after several miles of driving.
The VIN search acts as your personal private investigator. Using a vehicle's unique 17-character Vehicle Identification Number, it taps into millions of DMV records to reveal all of the history available on that particular car, from its first registration up until its very last DMV transaction.
The initial free VIN search will tell you the year, make and model so you can be sure it's actually the automobile the owner tells you it is...you'd be surprised how often a seller will tell you it's a later model than it actually is. In addition, it will tell you the country of manufacture, the restraint system as well as what type of brakes it has and how many doors.
After the free VIN search, you can dig deeper to find other important information about the car. This is called the vehicle history report, and it contains specific data such as hidden problems, including odometer tampering, serious mechanical issues, hail or fire damage, police use and much more. You will also find out if the vehicle has changed hands a number of times, how many miles should be on the vehicle, and other important facts.
There are two major companies that offer the VIN search and the full vehicle history report: CARFAX and AutoCheck, both well-established entities with billions of records on millions of used cars. The cost is only $19.99 for one report or $24.99 for unlimited reports. It makes sense to opt for the unlimited if you plan on looking at more than one car, as most people do. Chances are the first vehicle you look at won't be the one you end up buying.
We recommend that you have a professional take an extensive look at any vehicle you plan on purchasing, as used cars can cost thousands of dollars. Make sure you drive it around as well, especially on highways so you can get a feel for how it drives. And lastly, get a VIN search and vehicle history report before you buy...it's the only way to know for sure that the used car is worth buying.
Tuesday, September 05, 2006
Buy Cheap Vehicles From Federal Government Auctions - 5 Tips
By Anthony Lee
According to observers and analysts, it is surprising to note that, nowadays, there are more and more people who are preferring to buy cars at the Federal Government's car auctions.
Because there are more and more shoppers at government car auctions, sometimes, what are supposed to be cheap cars are made expensive and more costly. That is because the auction process solicits bids that topple each other just to get hold of a particular car.
It would be helpful if such people would take note of the following practical and logical tips on how they could secure vehicles at Federal Government auctions, at practically cheap prices. Here are some of those tips.
1. Be on the look out for announcements about forthcoming vehicle auctions by the Federal Government. As the saying goes, 'early birds catch early worms.' Being the first to bid would not ensure that you get the car, but it will give you a better bearing and position to keep the billing ball rolling.
2. Set your preferences and goals before going to the auction. Your main goal is to purchase at cheap prices, so doing otherwise would not only cost you more, but make you fail in attaining your goal.
3. Invite an expert or a more experienced peer or friend when coming over a Federal Government-sponsored vehicle auction. The move would ensure that you get the sound and right guidance and advice about bidding and choosing a particular repossessed and foreclosed vehicle for sale.
4. Inspect the car of your choice. Do it very thoroughly and carefully. Since the car is already a second-hand good, it would be inevitable that there are little or major flaws and defects on the engine or other parts. The presence of such defects should reflect in the tag price, making that car cheaper.
5. Inquire about the legal papers and documents that must come along with the car. You would not want to press yourself against such issues when you've already won the bidding process, so better do it ahead.
When aiming to buy vehicles from Federal Government-sponsored auctions, make sure that you so not lose your focus. Focus on the car, the price and the other tenders.
Saturday, September 02, 2006
Do-It-Yourself Clear Corner lights.
By Steven Chung
Tools needed:
Flathead screwdriver
Philips screwdriver
Pliers
Silicone sealant/caulking
Instructions:
1. Pop the hood.
2. Using the Philips screwdriver, remove the screw holding down the corner lamp to the chassis (located at the front left and right corners of the engine bay).
3. Remove corner lamp by sliding it towards the front of the vehicle.
4. Remove the bulb connector by turning it counter-clockwise.
5. Clean off dirt and place on working surface.![]()
6. Separate the rubber lining from the plastic. Careful not to tear it.![]()
7. Using the flathead screwdriver, begin separating the clear and gray plastic pieces starting at the bottom of the corner lamp that's closer to the amber piece.![]()
8. Continue separating the two plastic pieces using the flathead screwdriver. The separation of the glue may cause cracking sounds. Be careful not to crack the clear plastic piece.![]()
9. Using your fingers to keep pieces separated, use the pliers to get a hold of the amber piece inside.![]()
10. Remove the amber piece using the pliers. Be careful when removing it from it's attachment point inside the corner lamp.![]()
11. Seal the two pieces back together using a silicone caulk and let it dry for a few minutes.![]()
12. Reattach the rubber lining using the silicone caulk and let it dry for a few minutes.
13. Reattach the bulbs.
14. Reattach the corner lamps to the vehicle.
15. Replace the screws.
16. Enjoy!